Springboot
👹 springboot
本文中介绍了springboot的基础知识,包括springboot是什么,springboot的配置文件,springboot类似于spring的整合junit,整合mybatis,最后将spring中的一个项目转换成springboot的项目
SpringBoot简介
SpringBoot 是由 Pivotal 团队提供的全新框架,其设计目的是用简化 Spring 应用的初始搭建以及开发过程。
使用了 Spring 框架后已经简化了我们的开发。而 SpringBoot 又是对 Spring 开发进行简化的,可想而知 SpringBoot 使用的简单及广泛性。既然 SpringBoot 是用来简化 Spring 开发的,那我们就先回顾一下,以 SpringMVC 开发为例:
- 创建工程,并在
pom.xml配置文件中配置所依赖的坐标
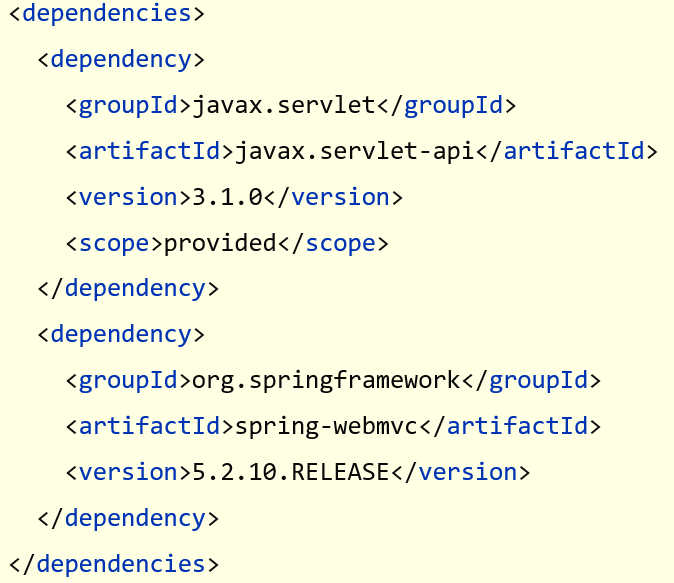
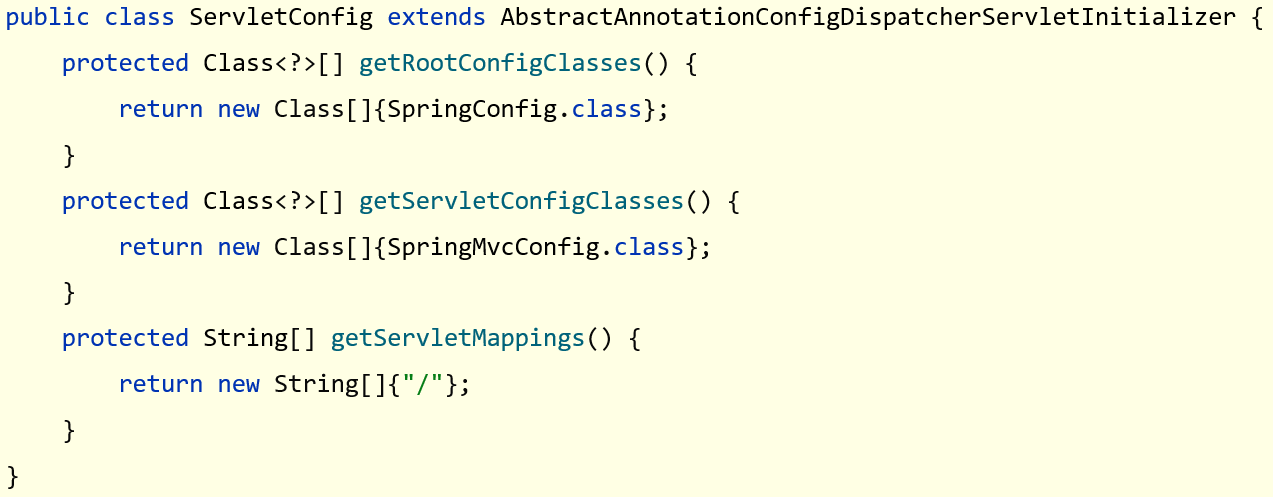
编写
web3.0的配置类作为
web程序,web3.0的配置类不能缺少,而这个配置类还是比较麻烦的,代码如下
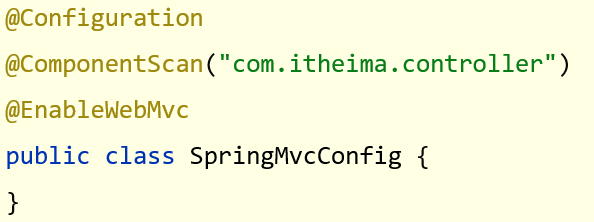
- 编写
SpringMVC的配置类
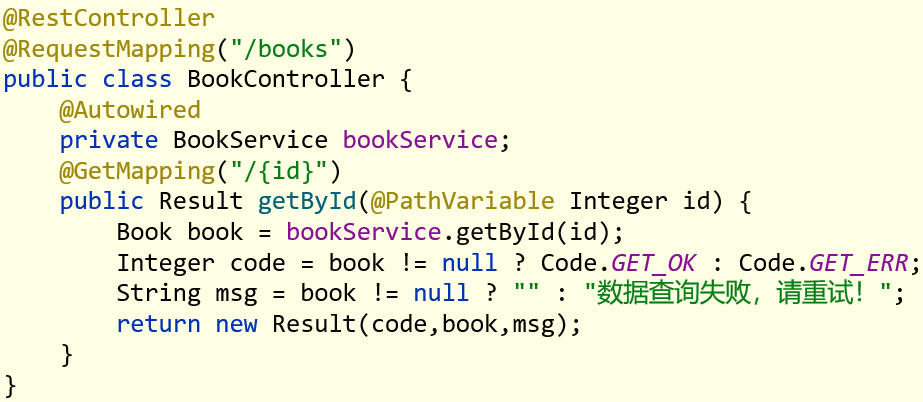
做到这只是将工程的架子搭起来。要想被外界访问,最起码还需要提供一个 Controller 类,在该类中提供一个方法。
- 编写
Controller类
从上面的 SpringMVC 程序开发可以看到,前三步都是在搭建环境,而且这三步基本都是固定的。SpringBoot 就是对这三步进行简化了。接下来我们通过一个入门案例来体现 SpingBoot 简化 Spring 开发。
SpringBoot快速入门
开发步骤
SpringBoot 开发起来特别简单,分为如下几步:
- 创建新模块,选择Spring初始化,并配置模块相关基础信息
- 选择当前模块需要使用的技术集
- 开发控制器类
- 运行自动生成的Application类
知道了 SpringBoot 的开发步骤后,接下来我们进行具体的操作
创建新模块
- 点击
+选择New Module创建新模块
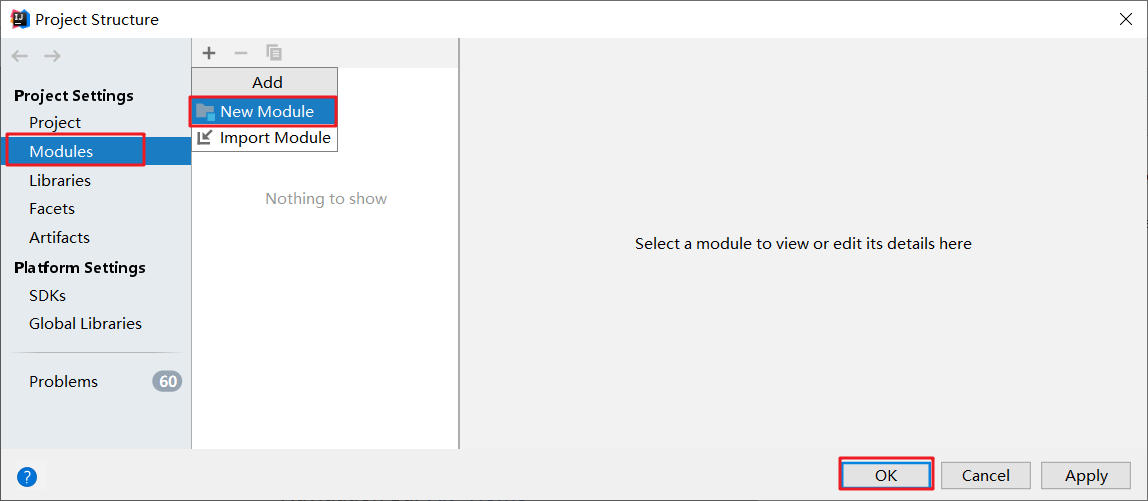
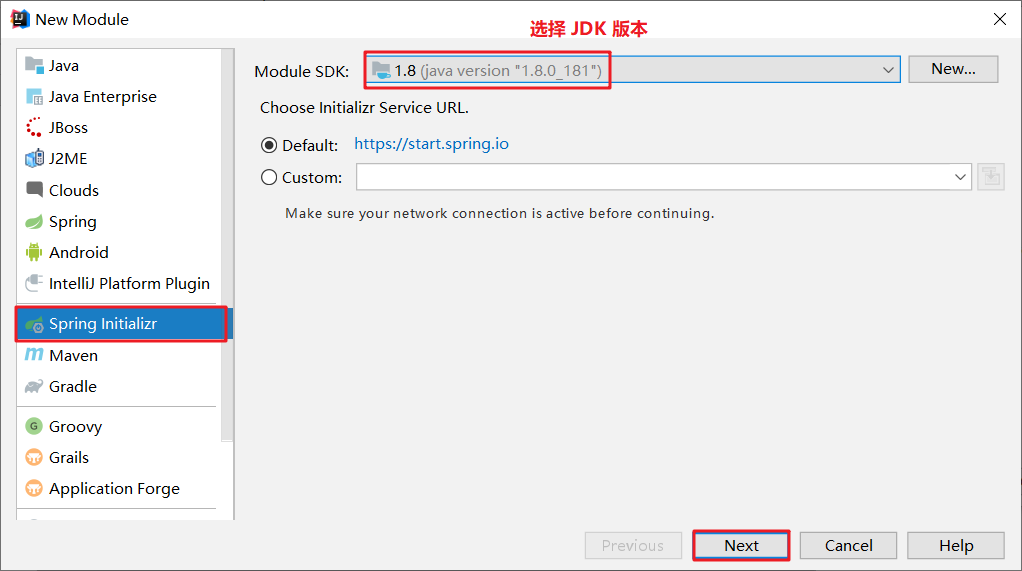
选择
Spring Initializr,用来创建SpringBoot工程以前我们选择的是
Maven,今天选择Spring Initializr来快速构建SpringBoot工程。而在Module SDK这一项选择我们安装的JDK版本。
对
SpringBoot工程进行相关的设置我们使用这种方式构建的
SpringBoot工程其实也是Maven工程,而该方式只是一种快速构建的方式而已。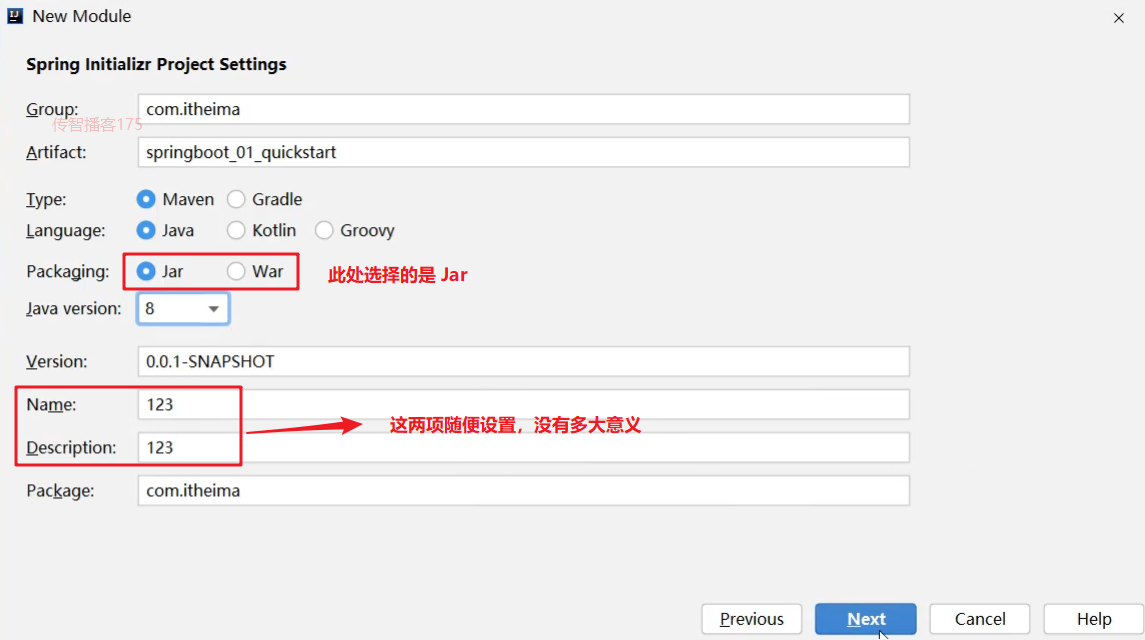
注意:打包方式这里需要设置为
Jar选中
Web,然后勾选Spring Web由于我们需要开发一个
web程序,使用到了SpringMVC技术,所以按照下图红框进行勾选
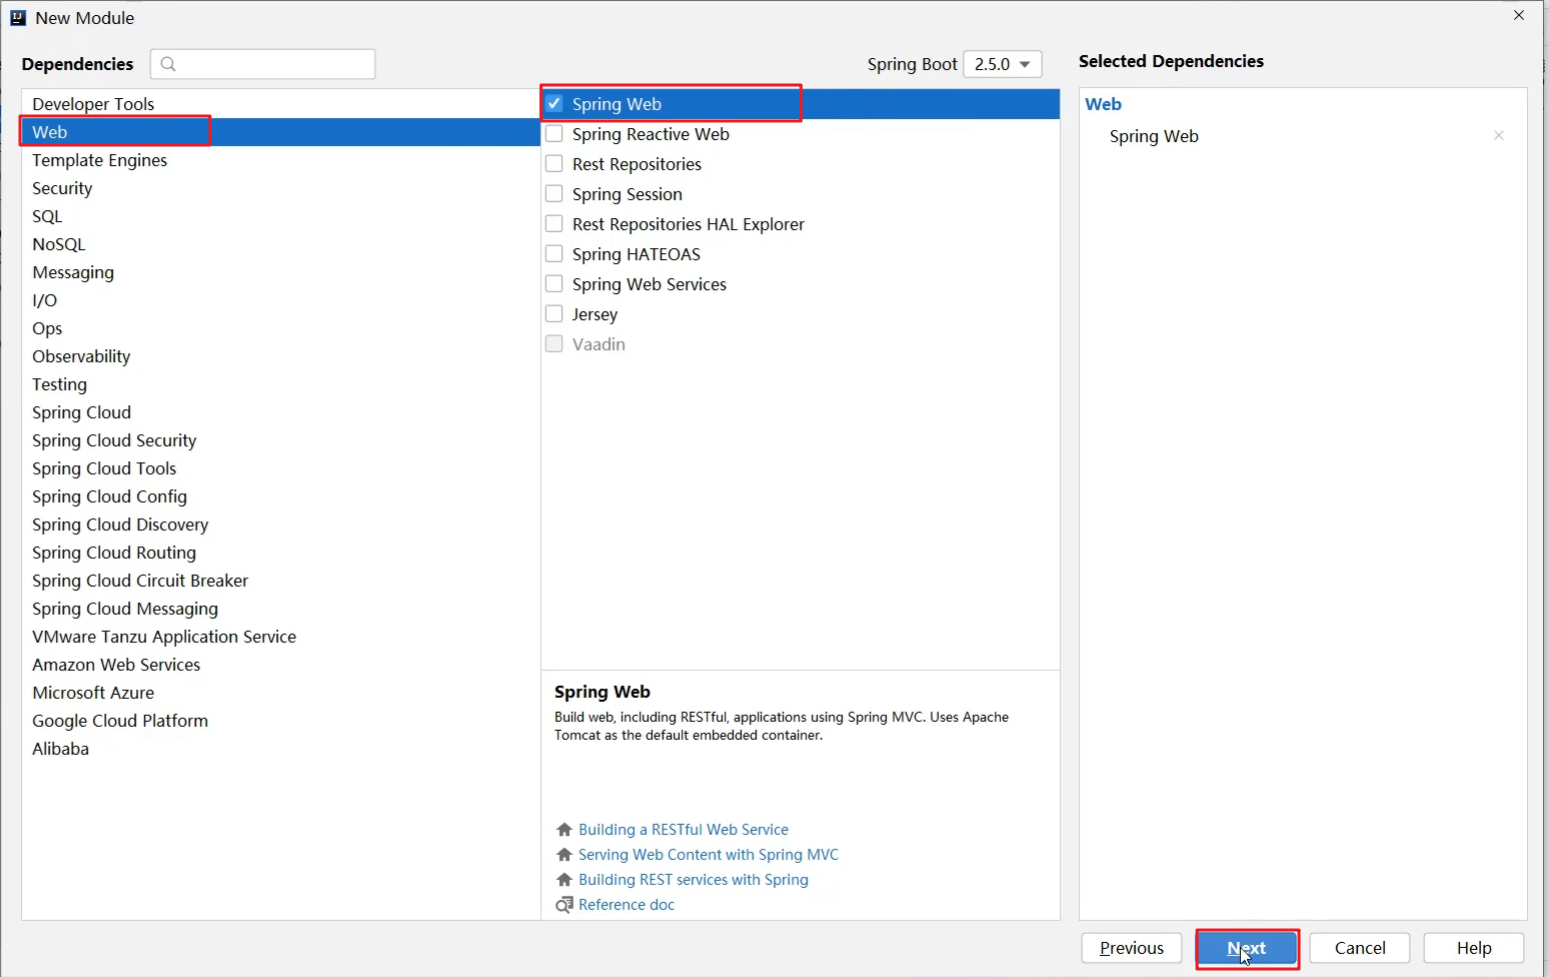
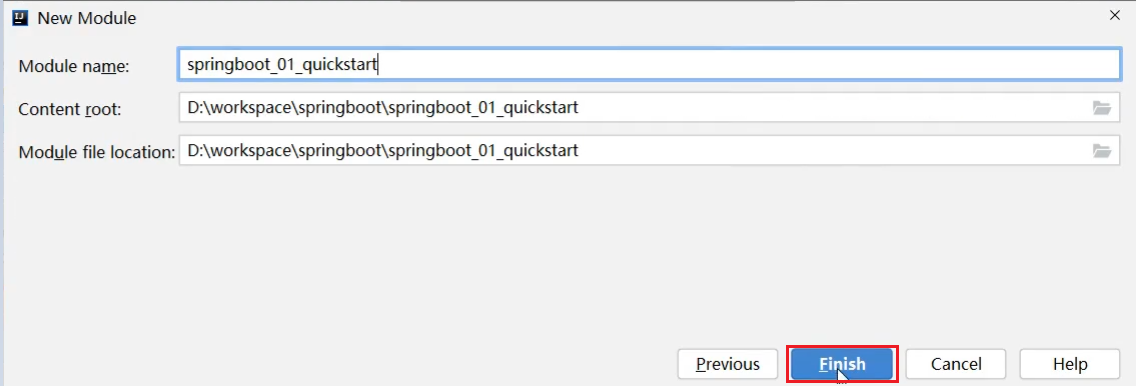
- 下图界面不需要任何修改,直接点击
Finish完成SpringBoot工程的构建
经过以上步骤后就创建了如下结构的模块,它会帮我们自动生成一个 Application 类,而该类一会再启动服务器时会用到
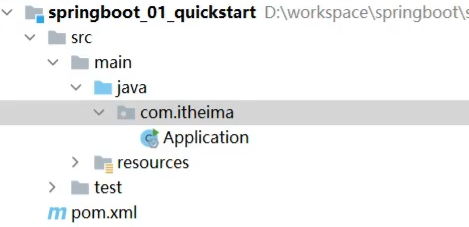
注意:
在创建好的工程中不需要创建配置类
创建好的项目会自动生成其他的一些文件,而这些文件目前对我们来说没有任何作用,所以可以将这些文件删除。
可以删除的目录和文件如下:
.mvn.gitignoreHELP.mdmvnwmvnw.cmd
创建 Controller
在 com.itheima.controller 包下创建 BookController ,代码如下:
| |
启动服务器
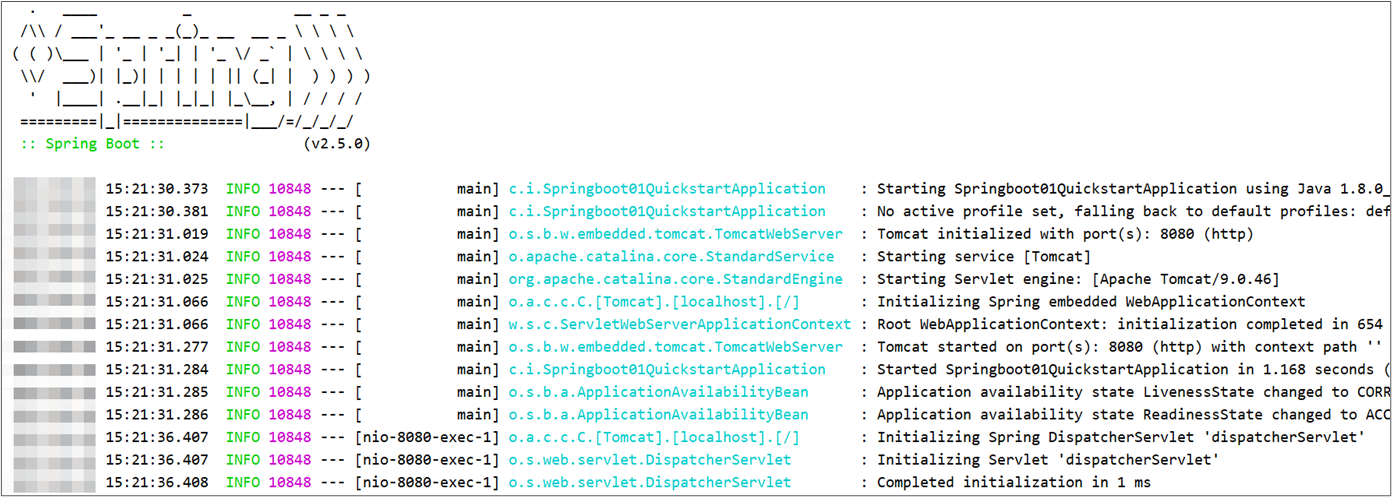
运行 SpringBoot 工程不需要使用本地的 Tomcat 和 插件,只运行项目 com.itheima 包下的 Application 类,我们就可以在控制台看出如下信息
进行测试
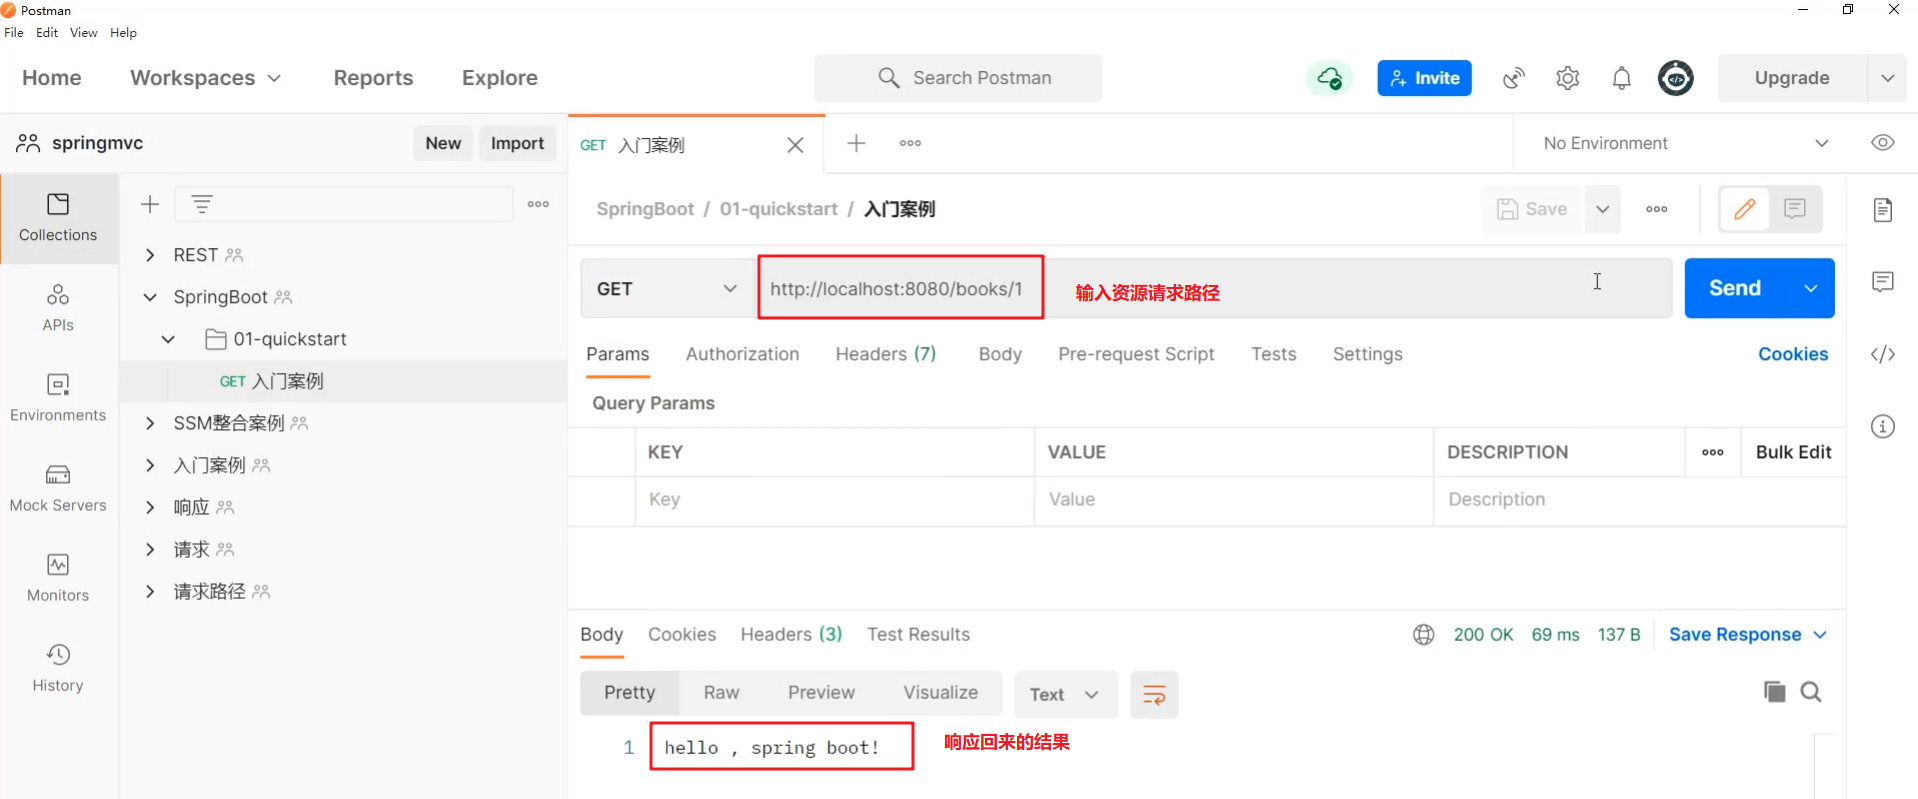
使用 Postman 工具来测试我们的程序
通过上面的入门案例我们可以看到使用 SpringBoot 进行开发,使整个开发变得很简单,那它是如何做到的呢?
要研究这个问题,我们需要看看 Application 类和 pom.xml 都书写了什么。先看看 Applicaion 类,该类内容如下:
| |
这个类中的东西很简单,就在类上添加了一个 @SpringBootApplication 注解,而在主方法中就一行代码。我们在启动服务器时就是执行的该类中的主方法。
再看看 pom.xml 配置文件中的内容
| |
我们代码之所以能简化,就是因为指定的父工程和 Spring Web 依赖实现的。具体的我们后面在聊。
对比
做完 SpringBoot 的入门案例后,接下来对比一下 Spring 程序和 SpringBoot 程序。如下图

坐标
Spring程序中的坐标需要自己编写,而且坐标非常多SpringBoot程序中的坐标是我们在创建工程时进行勾选自动生成的web3.0配置类
Spring程序需要自己编写这个配置类。这个配置类大家之前编写过,肯定感觉很复杂SpringBoot程序不需要我们自己书写配置类
Spring/SpringMVC程序的配置类需要自己书写。而SpringBoot程序则不需要书写。
注意:基于Idea的
Spring Initializr快速构建SpringBoot工程时需要联网。
官网构建工程
在入门案例中之所以能快速构建 SpringBoot 工程,是因为 Idea 使用了官网提供了快速构建 SpringBoot 工程的组件实现的。那如何在官网进行工程构建呢?通过如下步骤构建
进入SpringBoot官网
官网地址如下:
进入到 SpringBoot 官网后拖到最下方就可以看到如下内容

然后点击 Spring Initializr 超链接就会跳转到如下页面
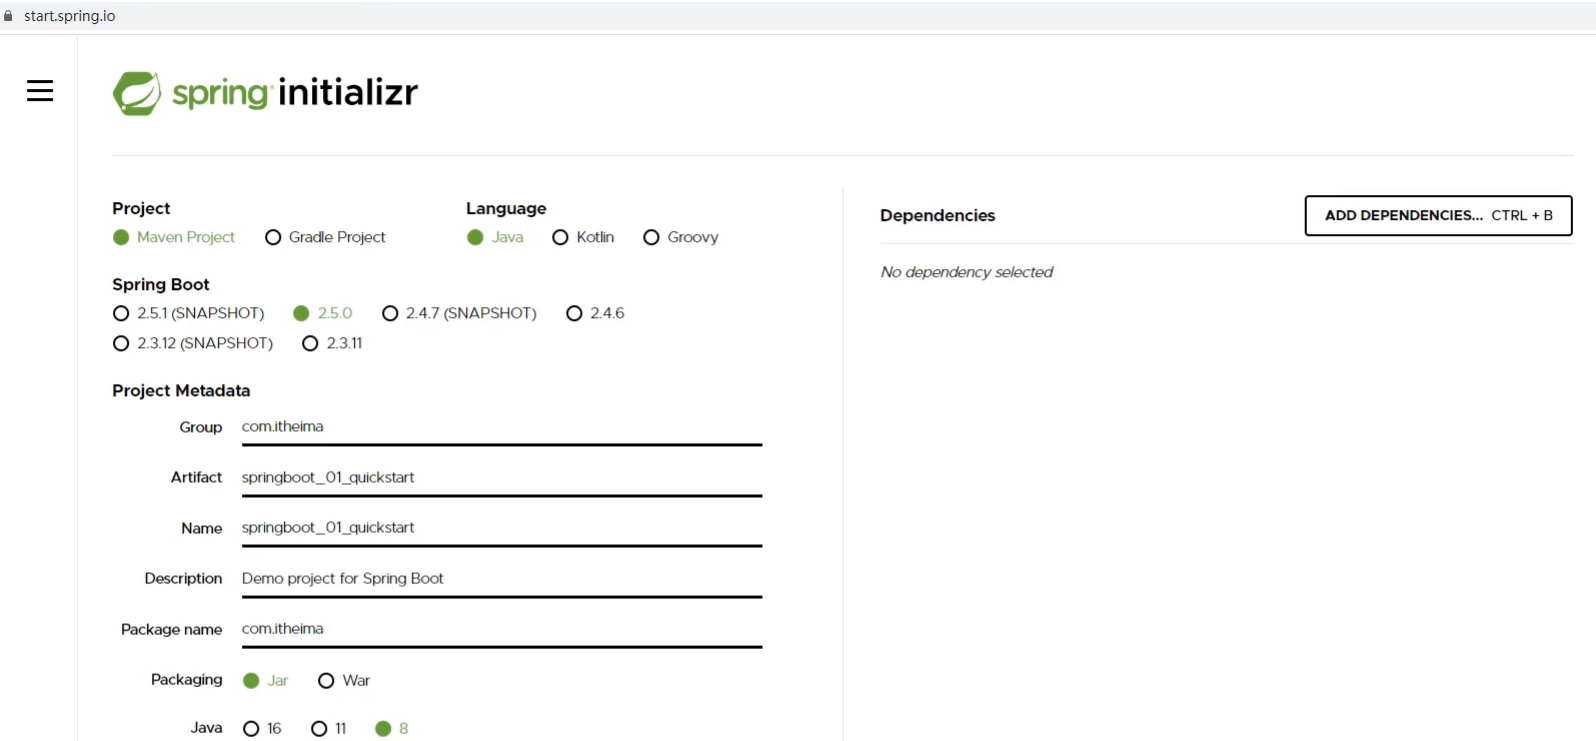
这个页面内容是不是感觉很眼熟的,这和我们使用 Idea 快速构建 SpringBoot 工程的界面基本相同。在上面页面输入对应的信息
选择依赖
选择 Spring Web 可以点击上图右上角的 ADD DEPENDENCIES... CTRL + B 按钮,就会出现如下界面

生成工程
以上步骤完成后就可以生成 SpringBoot 工程了。在页面的最下方点击 GENERATE CTRL + 回车 按钮生成工程并下载到本地,如下图所示

打开下载好的压缩包可以看到工程结构和使用 Idea 生成的一模一样,如下图
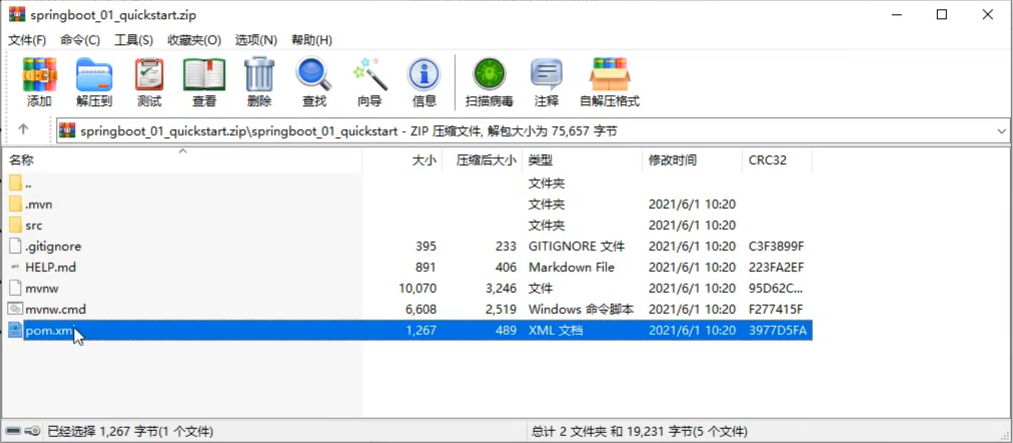
而打开 pom.xml 文件,里面也包含了父工程和 Spring Web 的依赖。
通过上面官网的操作,我们知道 Idea 中快速构建 SpringBoot 工程其实就是使用的官网的快速构建组件,那以后即使没有 Idea 也可以使用官网的方式构建 SpringBoot 工程。
SpringBoot工程快速启动
问题导入
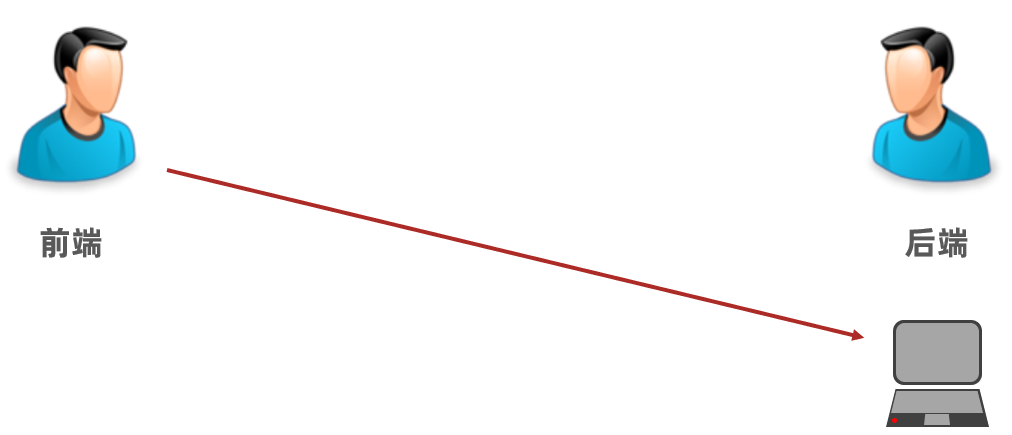
以后我们和前端开发人员协同开发,而前端开发人员需要测试前端程序就需要后端开启服务器,这就受制于后端开发人员。为了摆脱这个受制,前端开发人员尝试着在自己电脑上安装 Tomcat 和 Idea ,在自己电脑上启动后端程序,这显然不现实。
我们后端可以将 SpringBoot 工程打成 jar 包,该 jar 包运行不依赖于 Tomcat 和 Idea 这些工具也可以正常运行,只是这个 jar 包在运行过程中连接和我们自己程序相同的 Mysql 数据库即可。这样就可以解决这个问题,如下图
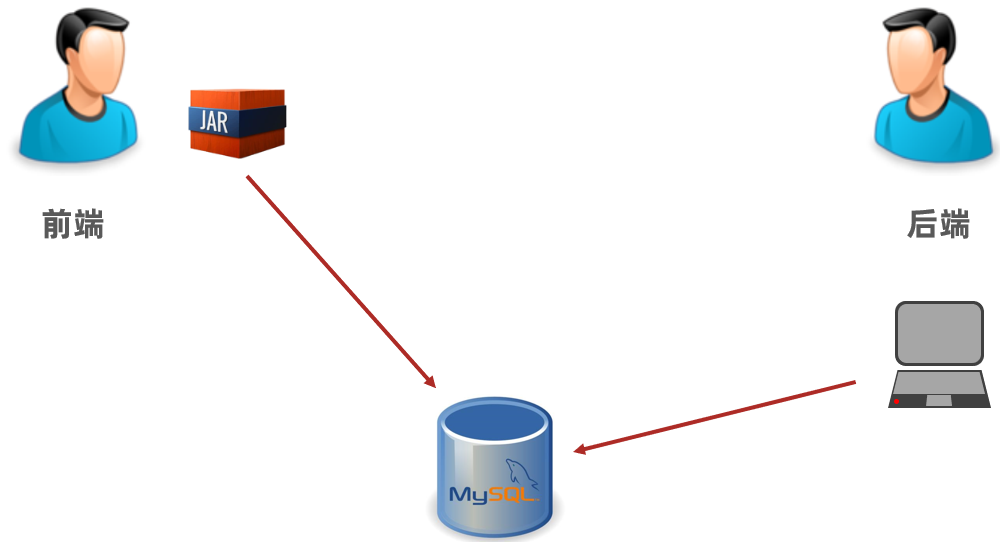
那现在问题是如何打包呢?
打包
由于我们在构建 SpringBoot 工程时已经在 pom.xml 中配置了如下插件
| |
所以我们只需要使用 Maven 的 package 指令打包就会在 target 目录下生成对应的 Jar 包。
注意:该插件必须配置,不然打好的
jar包也是有问题的。
启动
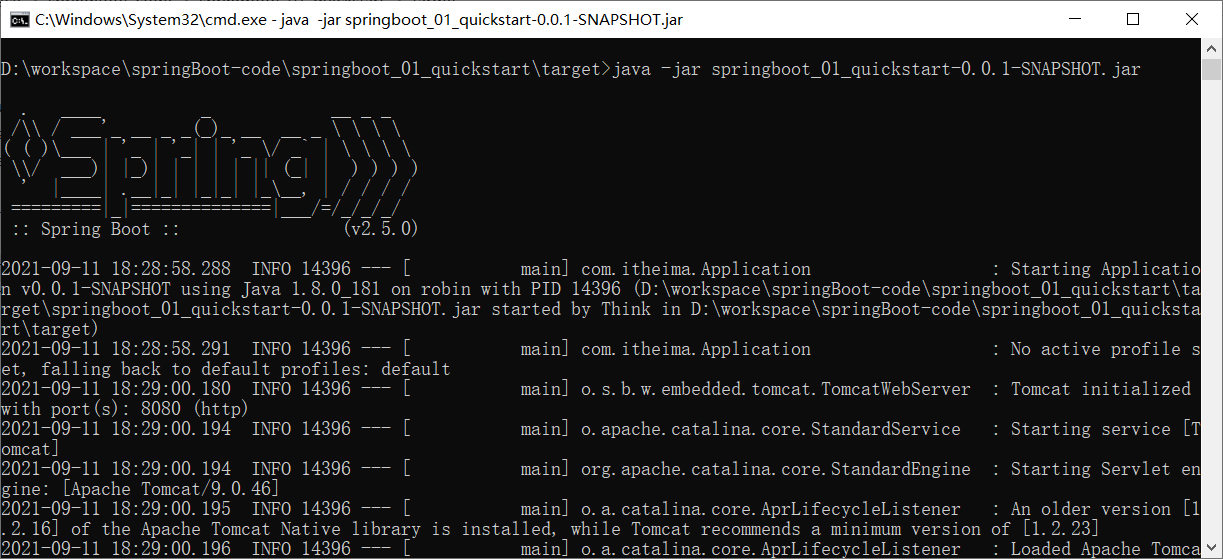
进入 jar 包所在位置,在 命令提示符 中输入如下命令
| |
执行上述命令就可以看到 SpringBoot 运行的日志信息
SpringBoot概述
SpringBoot 是由Pivotal团队提供的全新框架,其设计目的是用来简化Spring应用的初始搭建以及开发过程。
大家已经感受了 SpringBoot 程序,回过头看看 SpringBoot 主要作用是什么,就是简化 Spring 的搭建过程和开发过程。
原始 Spring 环境搭建和开发存在以下问题:
- 配置繁琐
- 依赖设置繁琐
SpringBoot 程序优点恰巧就是针对 Spring 的缺点
- 自动配置。这个是用来解决
Spring程序配置繁琐的问题 - 起步依赖。这个是用来解决
Spring程序依赖设置繁琐的问题 - 辅助功能(内置服务器,…)。我们在启动
SpringBoot程序时既没有使用本地的tomcat也没有使用tomcat插件,而是使用SpringBoot内置的服务器。
接下来我们来说一下 SpringBoot 的起步依赖
起步依赖
我们使用 Spring Initializr 方式创建的 Maven 工程的的 pom.xml 配置文件中自动生成了很多包含 starter 的依赖,如下图
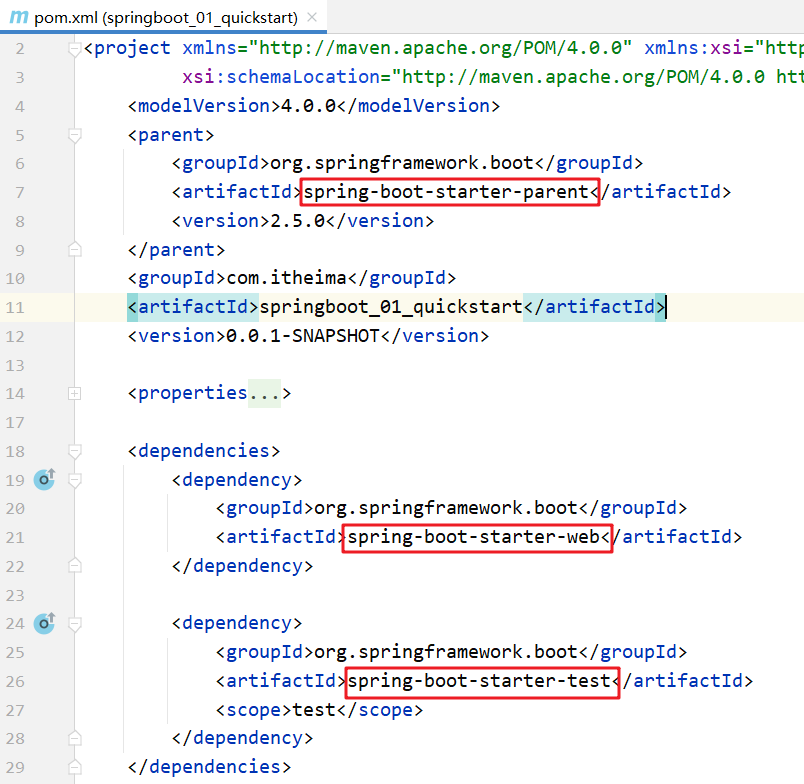
这些依赖就是启动依赖,接下来我们探究一下他是如何实现的。
探索父工程
从上面的文件中可以看到指定了一个父工程,我们进入到父工程,发现父工程中又指定了一个父工程,如下图所示

再进入到该父工程中,在该工程中我们可以看到配置内容结构如下图所示
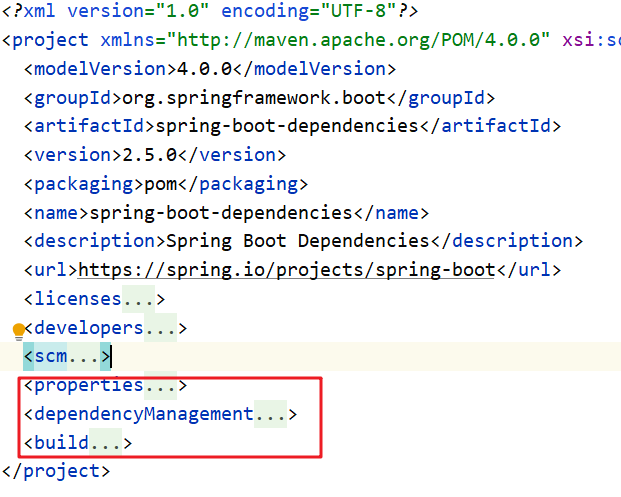
上图中的 properties 标签中定义了各个技术软件依赖的版本,避免了我们在使用不同软件技术时考虑版本的兼容问题。在 properties 中我们找 servlet 和 mysql 的版本如下图

dependencyManagement 标签是进行依赖版本锁定,但是并没有导入对应的依赖;如果我们工程需要那个依赖只需要引入依赖的 groupid 和 artifactId 不需要定义 version。
而 build 标签中也对插件的版本进行了锁定,如下图
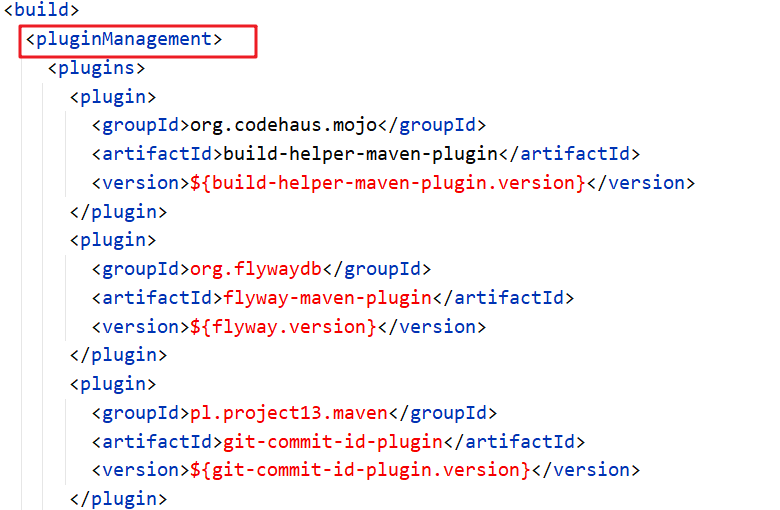
看完了父工程中 pom.xml 的配置后不难理解我们工程的的依赖为什么都没有配置 version。
探索依赖
在我们创建的工程中的 pom.xml 中配置了如下依赖

进入到该依赖,查看 pom.xml 的依赖会发现它引入了如下的依赖
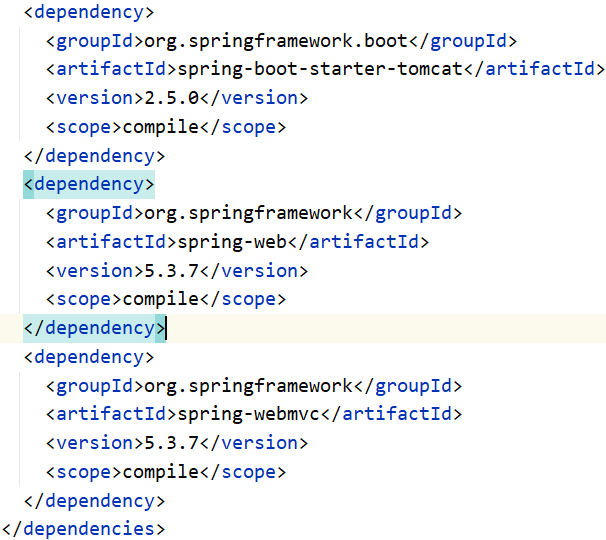
里面的引入了 spring-web 和 spring-webmvc 的依赖,这就是为什么我们的工程中没有依赖这两个包还能正常使用 springMVC 中的注解的原因。
而依赖 spring-boot-starter-tomcat ,从名字基本能确认内部依赖了 tomcat,所以我们的工程才能正常启动。
结论:以后需要使用技术,只需要引入该技术对应的起步依赖即可
小结
starter
SpringBoot中常见项目名称,定义了当前项目使用的所有项目坐标,以达到减少依赖配置的目的
parent
所有
SpringBoot项目要继承的项目,定义了若干个坐标版本号(依赖管理,而非依赖),以达到减少依赖冲突的目的spring-boot-starter-parent(2.5.0)与spring-boot-starter-parent(2.4.6)共计57处坐标版本不同
实际开发
使用任意坐标时,仅书写GAV中的G和A,V由SpringBoot提供
G:groupid
A:artifactId
V:version
如发生坐标错误,再指定version(要小心版本冲突)
也就是说版本可以自己指定,也可以用父工程中指定的版本
程序启动
创建的每一个 SpringBoot 程序时都包含一个类似于下面的类,我们将这个类称作引导类
| |
注意:
SpringBoot在创建项目时,采用jar的打包方式SpringBoot的引导类是项目的入口,运行main方法就可以启动项目因为我们在
pom.xml中配置了spring-boot-starter-web依赖,而该依赖通过前面的学习知道它依赖tomcat,所以运行main方法就可以使用tomcat启动咱们的工程。
切换web服务器
现在我们启动工程使用的是 tomcat 服务器,那能不能不使用 tomcat 而使用 jetty 服务器,jetty 在我们 maven 高级时讲 maven 私服使用的服务器。而要切换 web 服务器就需要将默认的 tomcat 服务器给排除掉,怎么排除呢?使用 exclusion 标签
| |
现在我们运行引导类可以吗?运行一下试试,打印的日志信息如下

程序直接停止了,为什么呢?那是因为排除了 tomcat 服务器,程序中就没有服务器了。所以此时不光要排除 tomcat 服务器,还要引入 jetty 服务器。在 pom.xml 中因为 jetty 的起步依赖
| |
接下来再次运行引导类,在日志信息中就可以看到使用的是 jetty 服务器

小结:
通过切换服务器,我们不难发现在使用 SpringBoot 换技术时只需要导入该技术的起步依赖即可。
配置文件
配置文件格式
我们现在启动服务器默认的端口号是 8080,访问路径可以书写为
http://localhost:8080/books/1
在线上环境我们还是希望将端口号改为 80,这样在访问的时候就可以不写端口号了,如下
http://localhost/books/1
而 SpringBoot 程序如何修改呢?SpringBoot 提供了多种属性配置方式
application.properties1server.port=80application.yml1 2server: port: 81application.yaml1 2server: port: 82
注意:
SpringBoot程序的配置文件名必须是application,只是后缀名不同而已。
环境准备
创建一个新工程 springboot_02_base_config 用来演示不同的配置文件,工程环境和入门案例一模一样,结构如下:
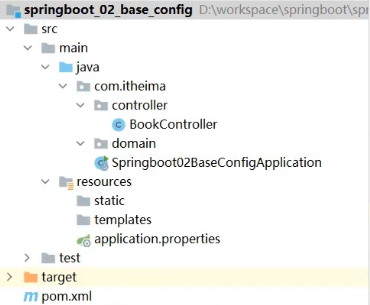
在该工程中的 com.itheima.controller 包下创建一个名为 BookController 的控制器。内容如下:
| |
不同配置文件演示
- application.properties配置文件
现在需要进行配置,配合文件必须放在 resources 目录下,而该目录下有一个名为 application.properties 的配置文件,我们就可以在该配置文件中修改端口号,在该配置文件中书写 port ,Idea 就会提示,如下
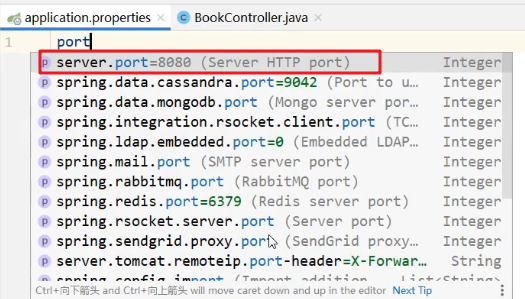
application.properties 配置文件内容如下:
| |
启动服务,会在控制台打印出日志信息,从日志信息中可以看到绑定的端口号已经修改了

- application.yml配置文件
删除 application.properties 配置文件中的内容。在 resources 下创建一个名为 application.yml 的配置文件,在该文件中书写端口号的配置项,格式如下:
| |
注意: 在
:后,数据前一定要加空格。
而在 yml 配置文件中也是有提示功能的,我们也可以在该文件中书写 port ,然后 idea 就会提示并书写成上面的格式
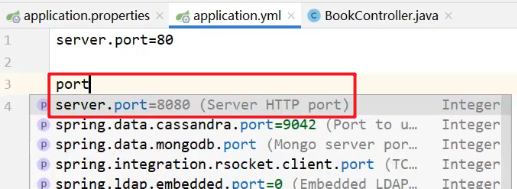
启动服务,可以在控制台看到绑定的端口号是 81

- application.yaml配置文件
删除 application.yml 配置文件和 application.properties 配置文件内容,然后在 resources 下创建名为 application.yaml 的配置文件,配置内容和后缀名为 yml 的配置文件中的内容相同,只是使用了不同的后缀名而已
application.yaml 配置文件内容如下:
| |
启动服务,在控制台可以看到绑定的端口号

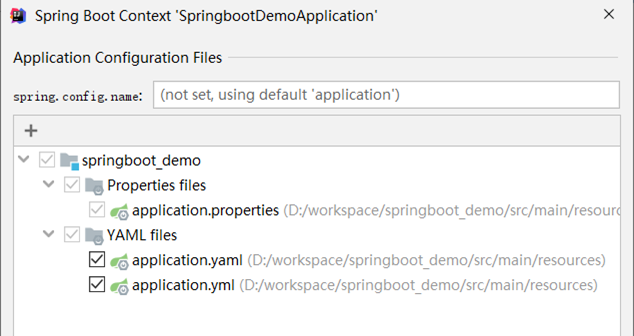
注意:在配合文件中如果没有提示,可以使用一下方式解决
- 点击
File选中Project Structure
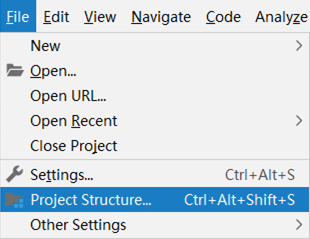
- 弹出如下窗口,按图中标记红框进行选择
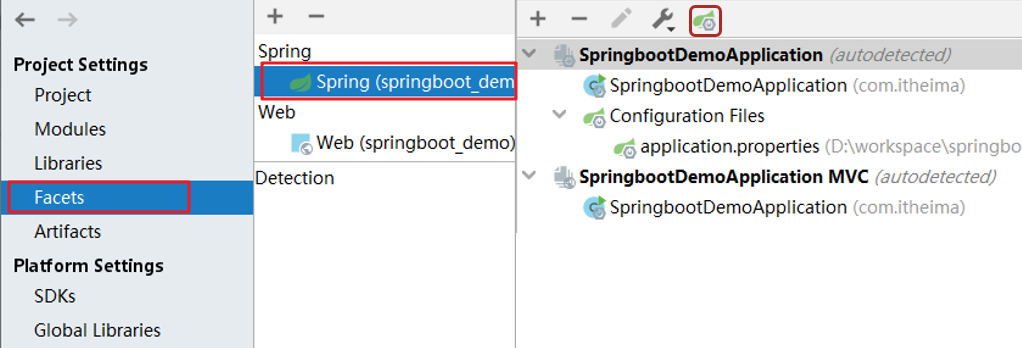
- 通过上述操作,会弹出如下窗口
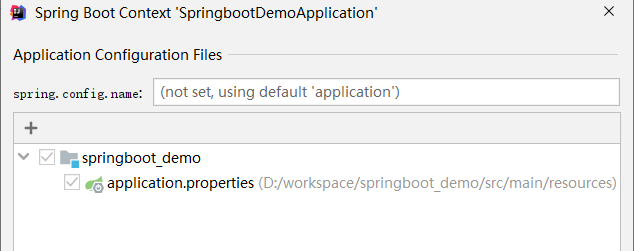
- 点击上图的
+号,弹出选择该模块的配置文件
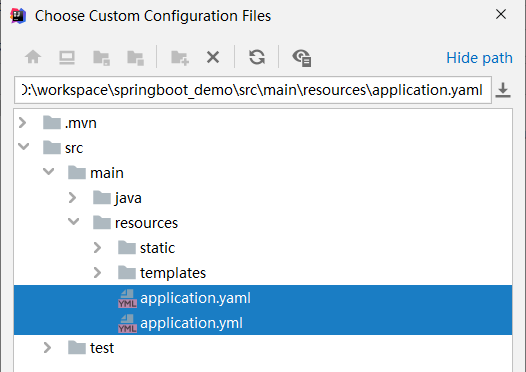
- 通过上述几步后,就可以看到如下界面。
properties类型的配合文件有一个,ymal类型的配置文件有两个
三种配合文件的优先级
在三种配合文件中分别配置不同的端口号,启动服务查看绑定的端口号。用这种方式就可以看到哪个配置文件的优先级更高一些
application.properties 文件内容如下:
| |
application.yml 文件内容如下:
| |
application.yaml 文件内容如下:
| |
启动服务,在控制台可以看到使用的端口号是 80。说明 application.properties 的优先级最高
注释掉 application.properties 配置文件内容。再次启动服务,在控制台可以看到使用的端口号是 81,说明 application.yml 配置文件为第二优先级。
从上述的验证结果可以确定三种配置文件的优先级是:
application.properties>application.yml>application.yaml
注意:
SpringBoot核心配置文件名为application
SpringBoot内置属性过多,且所有属性集中在一起修改,在使用时,通过提示键+关键字修改属性例如要设置日志的级别时,可以在配置文件中书写
logging,就会提示出来。配置内容如下
1 2 3logging: level: root: info
yaml格式
上面讲了三种不同类型的配置文件,而 properties 类型的配合文件之前我们学习过,接下来我们重点学习 yaml 类型的配置文件。
**YAML(YAML Ain’t Markup Language),一种数据序列化格式。**这种格式的配置文件在近些年已经占有主导地位,那么这种配置文件和前期使用的配置文件是有一些优势的,我们先看之前使用的配置文件。
最开始我们使用的是 xml ,格式如下:
| |
而 properties 类型的配置文件如下
| |
yaml 类型的配置文件内容如下
| |
优点:
容易阅读
yaml类型的配置文件比xml类型的配置文件更容易阅读,结构更加清晰容易与脚本语言交互
以数据为核心,重数据轻格式
yaml更注重数据,而xml更注重格式
YAML 文件扩展名:
.yml(主流).yaml
上面两种后缀名都可以,以后使用更多的还是 yml 的。
语法规则
大小写敏感
属性层级关系使用多行描述,每行结尾使用冒号结束
使用缩进表示层级关系,同层级左侧对齐,只允许使用空格(不允许使用Tab键)
空格的个数并不重要,只要保证同层级的左侧对齐即可。
属性值前面添加空格(属性名与属性值之间使用冒号+空格作为分隔)
# 表示注释
核心规则:数据前面要加空格与冒号隔开
数组数据在数据书写位置的下方使用减号作为数据开始符号,每行书写一个数据,减号与数据间空格分隔,例如
| |
yaml配置文件数据读取
环境准备
新创建一个名为 springboot_03_read_data 的 SpringBoot 工程,目录结构如下
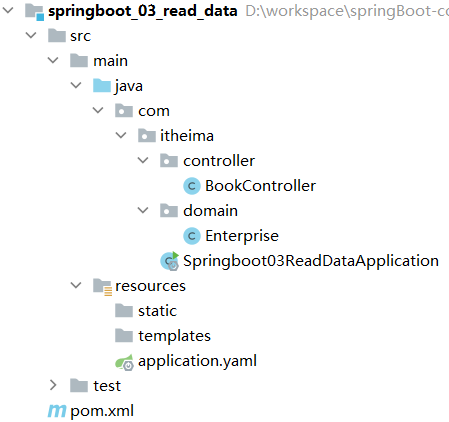
在 com.itheima.controller 包写创建名为 BookController 的控制器,内容如下
| |
在 com.itheima.domain 包下创建一个名为 Enterprise 的实体类等会用来封装数据,内容如下
| |
在 resources 下创建一个名为 application.yml 的配置文件,里面配置了不同的数据,内容如下
| |
读取配置数据
使用 @Value注解
使用 @Value("表达式") 注解可以从配合文件中读取数据,注解中用于读取属性名引用方式是:${一级属性名.二级属性名……}
我们可以在 BookController 中使用 @Value 注解读取配合文件数据,如下
| |
Environment对象
上面方式读取到的数据特别零散,SpringBoot 还可以使用 @Autowired 注解注入 Environment 对象的方式读取数据。这种方式 SpringBoot 会将配置文件中所有的数据封装到 Environment 对象中,如果需要使用哪个数据只需要通过调用 Environment 对象的 getProperty(String name) 方法获取。具体代码如下:
| |
注意:这种方式,框架内容大量数据,而在开发中我们很少使用。
自定义对象
SpringBoot 还提供了将配置文件中的数据封装到我们自定义的实体类对象中的方式。具体操作如下:
将实体类
bean的创建交给Spring管理。在类上添加
@Component注解使用
@ConfigurationProperties注解表示加载配置文件在该注解中也可以使用
prefix属性指定只加载指定前缀的数据在
BookController中进行注入
具体代码如下:
Enterprise 实体类内容如下:
| |
BookController 内容如下:
| |
注意:
使用第三种方式,在实体类上有如下警告提示

这个警告提示解决是在 pom.xml 中添加如下依赖即可
| |
多环境配置
以后在工作中,对于开发环境、测试环境、生产环境的配置肯定都不相同,比如我们开发阶段会在自己的电脑上安装 mysql ,连接自己电脑上的 mysql 即可,但是项目开发完毕后要上线就需要该配置,将环境的配置改为线上环境的。
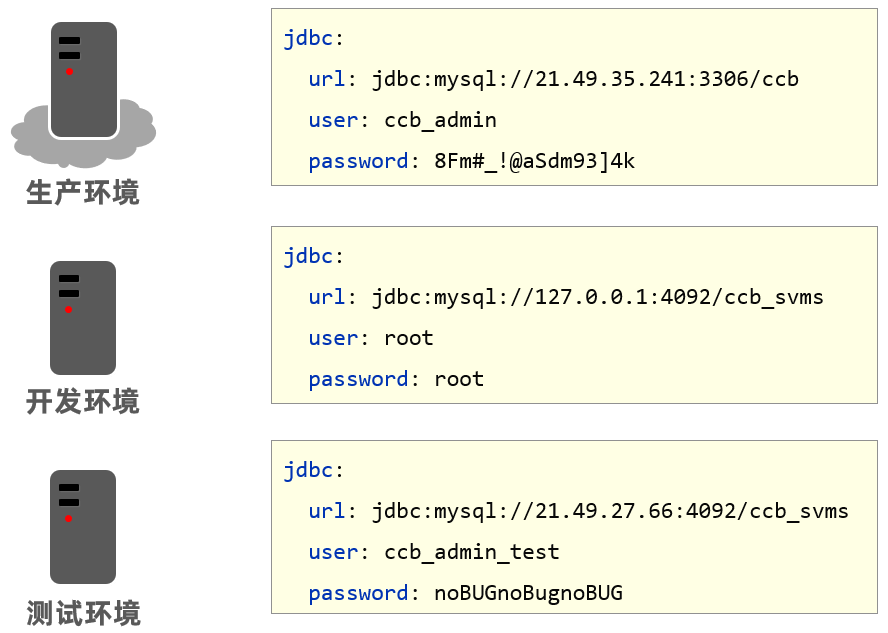
来回的修改配置会很麻烦,而 SpringBoot 给开发者提供了多环境的快捷配置,需要切换环境时只需要改一个配置即可。不同类型的配置文件多环境开发的配置都不相同,接下来对不同类型的配置文件进行说明
yaml文件
在 application.yml 中使用 --- 来分割不同的配置,内容如下
| |
上面配置中 spring.profiles 是用来给不同的配置起名字的。而如何告知 SpringBoot 使用哪段配置呢?可以使用如下配置来启用都一段配置
| |
综上所述,application.yml 配置文件内容如下
| |
注意:
在上面配置中给不同配置起名字的 spring.profiles 配置项已经过时。最新用来起名字的配置项是
| |
properties文件
properties 类型的配置文件配置多环境需要定义不同的配置文件
application-dev.properties是开发环境的配置文件。我们在该文件中配置端口号为801server.port=80application-test.properties是测试环境的配置文件。我们在该文件中配置端口号为811server.port=81application-pro.properties是生产环境的配置文件。我们在该文件中配置端口号为821server.port=82
SpringBoot 只会默认加载名为 application.properties 的配置文件,所以需要在 application.properties 配置文件中设置启用哪个配置文件,配置如下:
| |
命令行启动参数设置
使用 SpringBoot 开发的程序以后都是打成 jar 包,通过 java -jar xxx.jar 的方式启动服务的。那么就存在一个问题,如何切换环境呢?因为配置文件打到的jar包中了。
我们知道 jar 包其实就是一个压缩包,可以解压缩,然后修改配置,最后再打成jar包就可以了。这种方式显然有点麻烦,而 SpringBoot 提供了在运行 jar 时设置开启指定的环境的方式,如下
| |
那么这种方式能不能临时修改端口号呢?也是可以的,可以通过如下方式
| |
当然也可以同时设置多个配置,比如即指定启用哪个环境配置,又临时指定端口,如下
| |
大家进行测试后就会发现命令行设置的端口号优先级高(也就是使用的是命令行设置的端口号),配置的优先级其实 SpringBoot 官网已经进行了说明,参见 :
进入上面网站后会看到如下页面
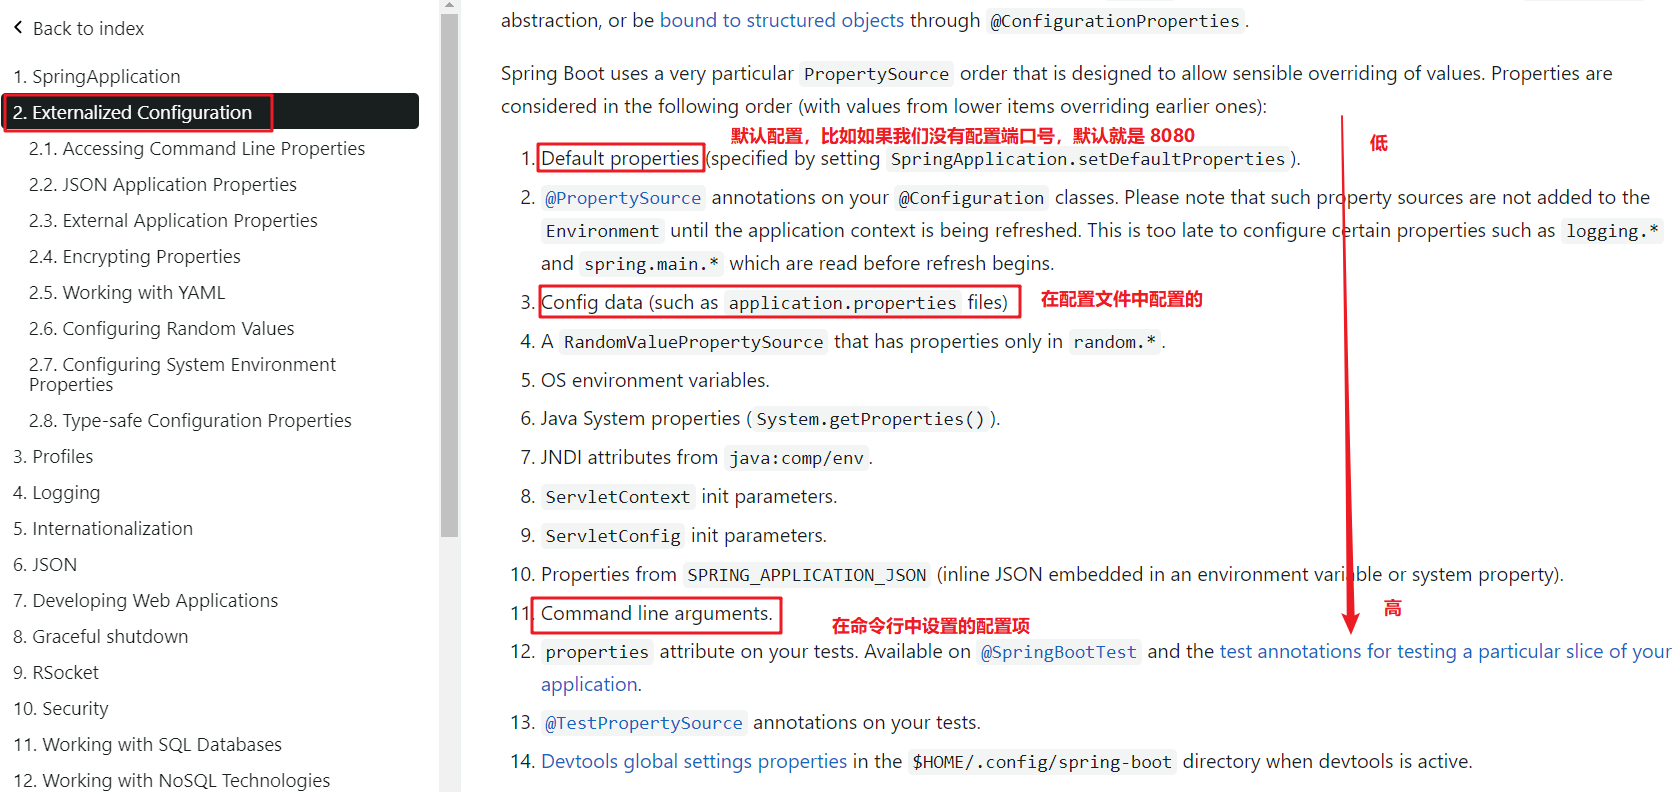
如果使用了多种方式配合同一个配置项,优先级高的生效。
总结
为了实现多环境开发,可以在yml配置文件中书写多套配置文件,然后在application.yml文件中指定激活哪一套环境,也可以在pom文件中配置多套环境,然后maven中使用profile.active标签和activeByDefault标签来共同决定开启哪一套配置环境,yml文件中读取pom中的配置即可,例如,在yml配置文件中配置:
| |
在pom文件中配置:
| |
配置文件分类

有这样的场景,我们开发完毕后需要测试人员进行测试,由于测试环境和开发环境的很多配置都不相同,所以测试人员在运行我们的工程时需要临时修改很多配置,如下
| |
针对这种情况,SpringBoot 定义了配置文件不同的放置的位置;而放在不同位置的优先级时不同的。
SpringBoot 中4级配置文件放置位置:
- 1级:classpath:application.yml
- 2级:classpath:config/application.yml
- 3级:file :application.yml
- 4级:file :config/application.yml
说明:级别越高优先级越高
代码演示
在这里我们只演示不同级别配置文件放置位置的优先级。
环境准备
创建一个名为 springboot_06_config_file 的 SpringBoot 工程,目录结构如下
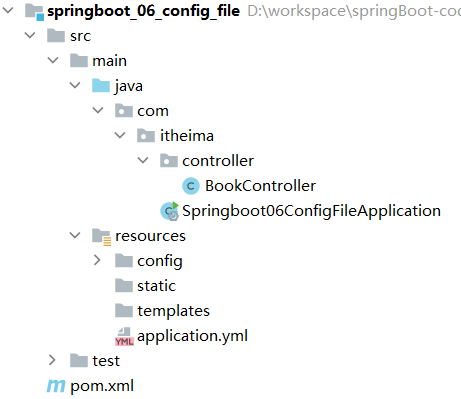
在 resources 下创建一个名为 config 的目录,在该目录中创建 application.yml 配置文件,而在该配置文件中将端口号设置为 81,内容如下
| |
而在 resources 下创建的 application.yml 配置文件中并将端口号设置为 80,内容如下
| |
验证1级和2级的优先级
运行启动引导类,可以在控制台看到如下日志信息

通过这个结果可以得出:类路径下的 config 下的配置文件优先于类路径下的配置文件。
验证2级和4级的优先级
要验证4级,按照以下步骤完成
将工程打成
jar包点击工程的
package来打jar包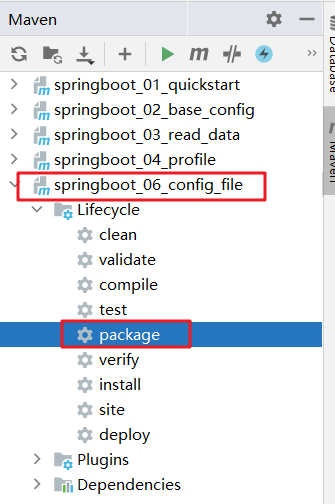
在硬盘上找到
jar包所在位置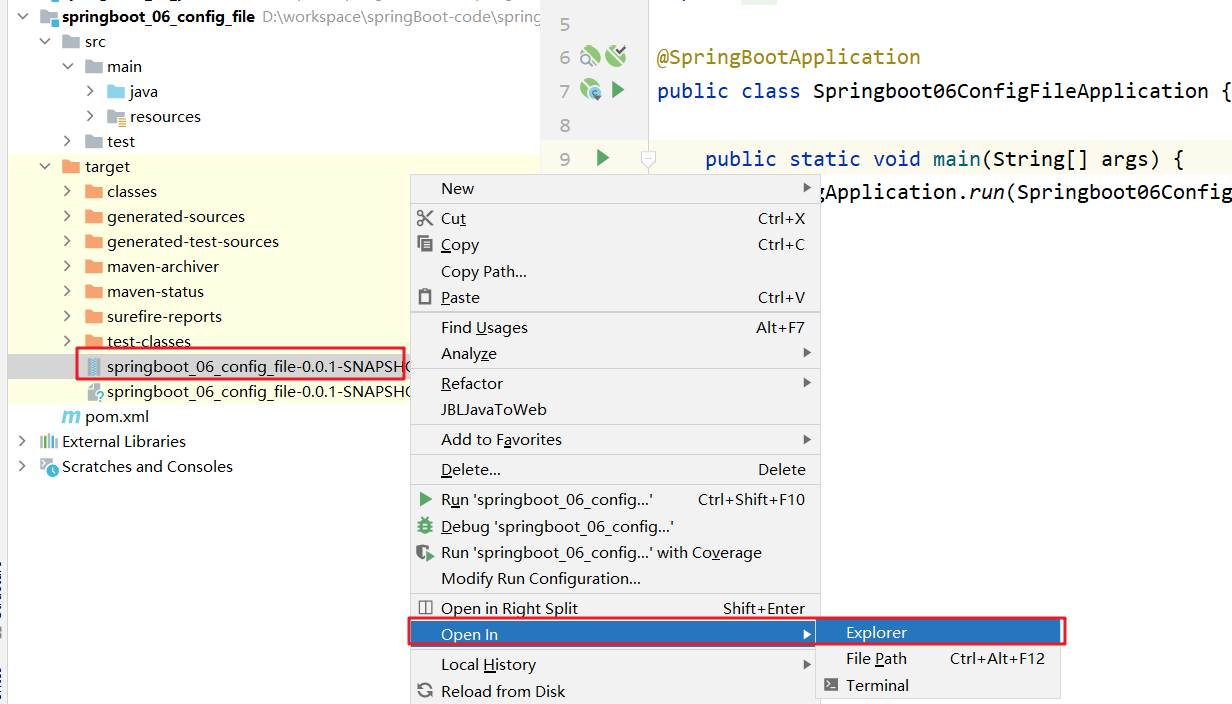
在
jar包所在位置创建config文件夹,在该文件夹下创建application.yml配置文件,而在该配合文件中将端口号设置为82在命令行使用以下命令运行程序
1java -jar springboot_06_config_file-0.0.1-SNAPSHOT.jar运行后日志信息如下

通过这个结果可以得出:file:
config下的配置文件优先于类路径下的配置文件。
注意:
SpringBoot 2.5.0版本存在一个bug,我们在使用这个版本时,需要在
jar所在位置的config目录下创建一个任意名称的文件夹
SpringBoot整合junit
回顾 Spring 整合 junit
| |
使用 @RunWith 注解指定运行器,使用 @ContextConfiguration 注解来指定配置类或者配置文件。而 SpringBoot 整合 junit 特别简单,分为以下三步完成
- 在测试类上添加
SpringBootTest注解 - 使用
@Autowired注入要测试的资源 - 定义测试方法进行测试
环境准备
创建一个名为 springboot_07_test 的 SpringBoot 工程,工程目录结构如下
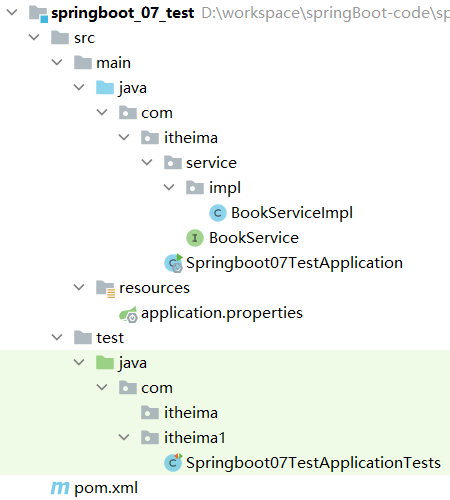
在 com.itheima.service 下创建 BookService 接口,内容如下
| |
在 com.itheima.service.impl 包写创建一个 BookServiceImpl 类,使其实现 BookService 接口,内容如下
| |
编写测试类
在 test/java 下创建 com.itheima 包,在该包下创建测试类,将 BookService 注入到该测试类中
| |
**注意:**这里的引导类所在包必须是测试类所在包及其子包。
例如:
- 引导类所在包是
com.itheima- 测试类所在包是
com.itheima如果不满足这个要求的话,就需要在使用
@SpringBootTest注解时,使用classes属性指定引导类的字节码对象。如@SpringBootTest(classes = Springboot07TestApplication.class)
SpringBoot整合mybatis
回顾Spring整合Mybatis
Spring 整合 Mybatis 需要定义很多配置类
SpringConfig配置类导入
JdbcConfig配置类导入
MybatisConfig配置类1 2 3 4 5 6@Configuration @ComponentScan("com.itheima") @PropertySource("classpath:jdbc.properties") @Import({JdbcConfig.class,MyBatisConfig.class}) public class SpringConfig { }
JdbcConfig配置类定义数据源(加载properties配置项:driver、url、username、password)
1 2 3 4 5 6 7 8 9 10 11 12 13 14 15 16 17 18 19 20public class JdbcConfig { @Value("${jdbc.driver}") private String driver; @Value("${jdbc.url}") private String url; @Value("${jdbc.username}") private String userName; @Value("${jdbc.password}") private String password; @Bean public DataSource getDataSource(){ DruidDataSource ds = new DruidDataSource(); ds.setDriverClassName(driver); ds.setUrl(url); ds.setUsername(userName); ds.setPassword(password); return ds; } }
MybatisConfig配置类定义
SqlSessionFactoryBean定义映射配置
1 2 3 4 5 6 7 8 9 10 11 12 13 14@Bean public MapperScannerConfigurer getMapperScannerConfigurer(){ MapperScannerConfigurer msc = new MapperScannerConfigurer(); msc.setBasePackage("com.itheima.dao"); return msc; } @Bean public SqlSessionFactoryBean getSqlSessionFactoryBean(DataSource dataSource){ SqlSessionFactoryBean ssfb = new SqlSessionFactoryBean(); ssfb.setTypeAliasesPackage("com.itheima.domain"); ssfb.setDataSource(dataSource); return ssfb; }
SpringBoot整合mybatis
创建模块
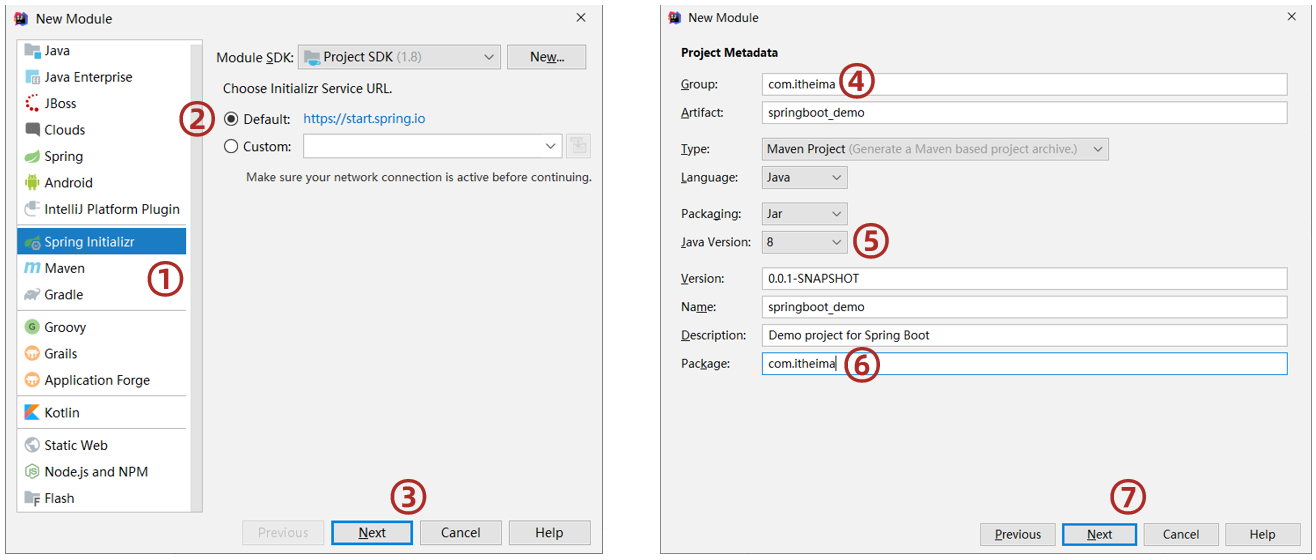
- 创建新模块,选择
Spring Initializr,并配置模块相关基础信息
选择当前模块需要使用的技术集(MyBatis、MySQL)
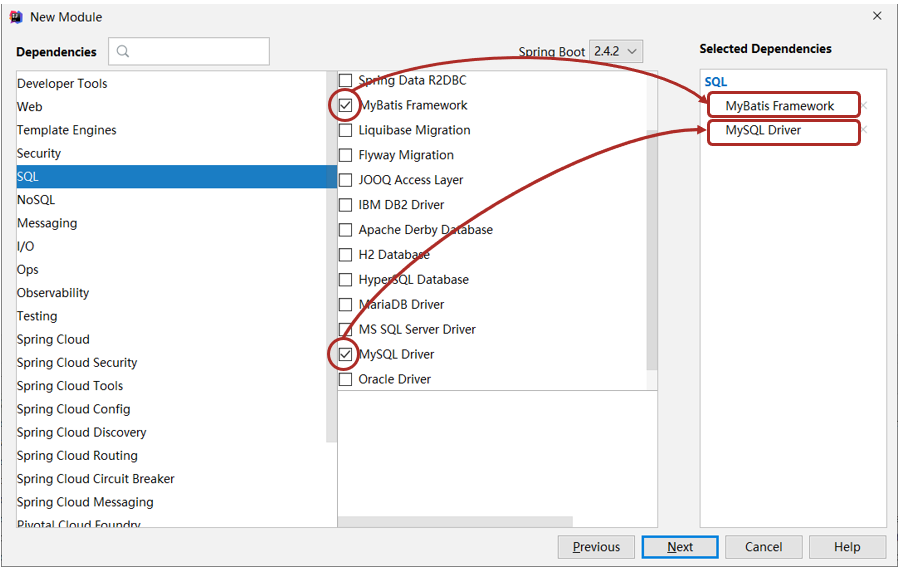
定义实体类
在 com.itheima.domain 包下定义实体类 Book,内容如下
| |
定义dao接口
在 com.itheima.dao 包下定义 BookDao 接口,内容如下
| |
定义测试类
在 test/java 下定义包 com.itheima ,在该包下测试类,内容如下
| |
编写配置
我们代码中并没有指定连接哪儿个数据库,用户名是什么,密码是什么。所以这部分需要在 SpringBoot 的配置文件中进行配合。
在 application.yml 配置文件中配置如下内容
| |
测试
运行测试方法,我们会看到如下错误信息

错误信息显示在 Spring 容器中没有 BookDao 类型的 bean。为什么会出现这种情况呢?
原因是 Mybatis 会扫描接口并创建接口的代码对象交给 Spring 管理,但是现在并没有告诉 Mybatis 哪个是 dao 接口。而我们要解决这个问题需要在BookDao 接口上使用 @Mapper ,BookDao 接口改进为
| |
注意:
SpringBoot版本低于2.4.3(不含),Mysql驱动版本大于8.0时,需要在url连接串中配置时区jdbc:mysql://localhost:3306/ssm_db?serverTimezone=UTC,或在MySQL数据库端配置时区解决此问题
使用Druid数据源
现在我们并没有指定数据源,SpringBoot 有默认的数据源,我们也可以指定使用 Druid 数据源,按照以下步骤实现
导入
Druid依赖1 2 3 4 5<dependency> <groupId>com.alibaba</groupId> <artifactId>druid</artifactId> <version>1.1.16</version> </dependency>在
application.yml配置文件配置可以通过
spring.datasource.type来配置使用什么数据源。配置文件内容可以改进为1 2 3 4 5 6 7spring: datasource: driver-class-name: com.mysql.cj.jdbc.Driver url: jdbc:mysql://localhost:3306/ssm_db?serverTimezone=UTC username: root password: root type: com.alibaba.druid.pool.DruidDataSource
案例
SpringBoot 到这就已经学习完毕,接下来我们将学习 SSM 时做的三大框架整合的案例用 SpringBoot 来实现一下。我们完成这个案例基本是将之前做的拷贝过来,修改成 SpringBoot 的即可,主要从以下几部分完成
pom.xml
配置起步依赖,必要的资源坐标(druid)
application.yml
设置数据源、端口等
配置类
全部删除
dao
设置@Mapper
测试类
页面
放置在resources目录下的static目录中
创建工程
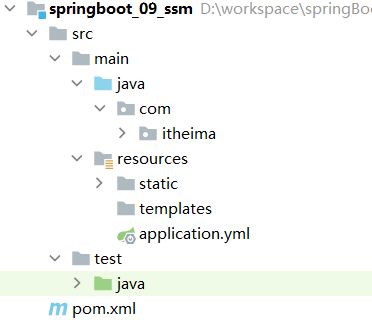
创建 SpringBoot 工程,在创建工程时需要勾选 web、mysql、mybatis,工程目录结构如下
由于我们工程中使用到了 Druid ,所以需要导入 Druid 的坐标
| |
代码拷贝
将 springmvc_11_page 工程中的 java 代码及测试代码连同包拷贝到 springboot_09_ssm 工程,按照下图进行拷贝
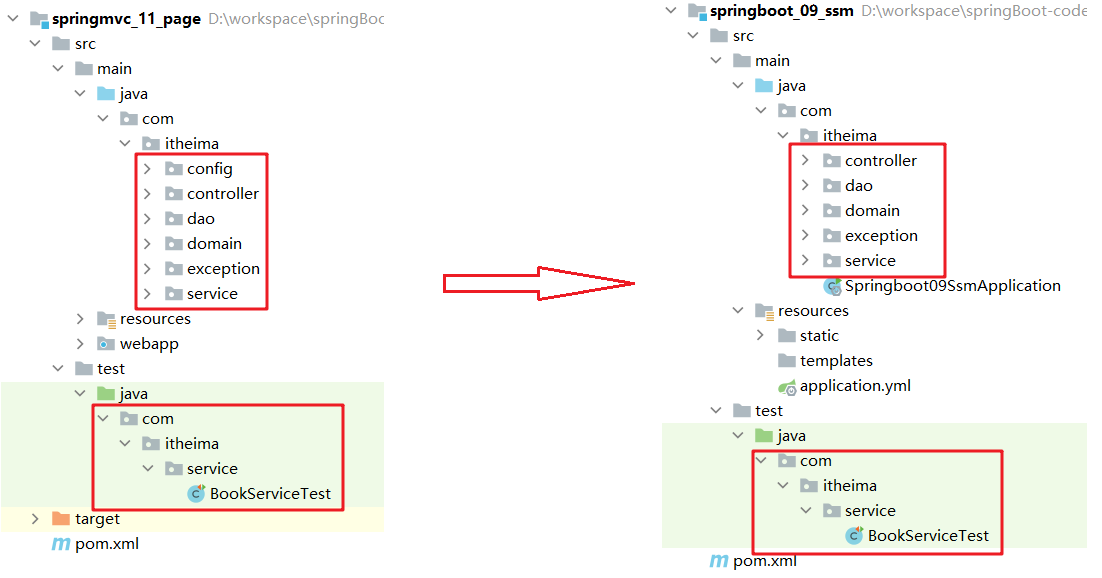
需要修改的内容如下:
Springmvc_11_page中config包下的是配置类,而SpringBoot工程不需要这些配置类,所以这些可以直接删除dao包下的接口上在拷贝到springboot_09-ssm工程中需要在接口中添加@Mapper注解BookServiceTest测试需要改成SpringBoot整合junit的1 2 3 4 5 6 7 8 9 10 11 12 13 14 15 16 17 18@SpringBootTest public class BookServiceTest { @Autowired private BookService bookService; @Test public void testGetById(){ Book book = bookService.getById(2); System.out.println(book); } @Test public void testGetAll(){ List<Book> all = bookService.getAll(); System.out.println(all); } }
配置文件
在 application.yml 配置文件中需要配置如下内容
- 服务的端口号
- 连接数据库的信息
- 数据源
| |
静态资源
在 SpringBoot 程序中是没有 webapp 目录的,那么在 SpringBoot 程序中静态资源需要放在什么位置呢?
静态资源需要放在 resources 下的 static 下,如下图所示
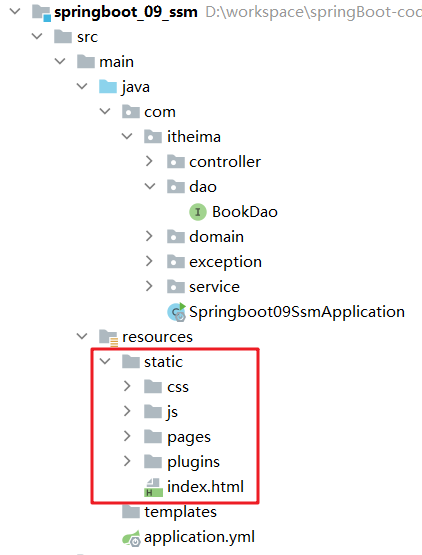
修改完成之后就可以直接启动项目,相当于将spring中的多余部分直接删除,加上一些必要的注解,并且重新配置一个application.yml配置文件即可
